As homeowners, you may want to modernize your outdoor space and enhance its curb appeal. Laying pavers in your yard is an excellent and cost-effective way of modernizing your outdoor space.
What Are Pavers?
Also known as paving stones, pavers refer to flat sections of bricks, concrete, or natural stone fitted together tightly to create a structure. Whether you plan to construct your walkway, driveway, or patio, you can never go wrong with pavers.
Pavers are fashionable as a DIY landscaping option due to their affordability. You can find a wide array of pavers at your local home improvement store.
They are also pretty simple to lay down.
How to Lay Patio Pavers on Dirt
Before we look at how to install pavers over dirt, let’s delve into what you need for this DIY project:
Materials
- Pavers of your choice
- Stakes
- Sand
- Twine
- 2-by-4 piece of wood
Tools
- Safety glasses
- Work gloves
- Tape measure
- Rake
- Shovel
- Level
- Hand compactor
- Rubber mallet
- Edge restraints
A Step-By-Step Guide on Laying Pavers on Dirt
When laying pavers on dirt, it pays to follow all recommended steps outlined below.
Preparing the Ground for Pavers
1. Identify and Measure the Site
Before installing the pavers, you must ensure that the ground is ready. Plot out the section you intend to install pavers on and outline it with the stakes using the measuring tape. Take note of the site’s square footage to calculate how many pavers to buy accurately.
Remember to gauge the slope. The pavers should slope slightly to avoid water pooling.
2. Excavate the Paving Area
Ensure that you remove any grass or weeds. Use a shovel to dig deep and get rid of the roots to avoid future growth. The excavated section should be deep enough to take in gravel, sand, and the pavers.
Tip: After removing the grass, you can transplant it on the bare areas of your yard.
3. Level the Paver Base With Dirt
For your pavers to line up well, you should place them on a level surface (using a layer of sand). Also, make sure you get clean dirt from a reputable supplier to avoid topsoil. Topsoil has organic matter, which changes its volume over time.
The ideal option would be to use a gravel base instead of dirt. Gravel contains less moisture and compacts effortlessly.
Laying the Pavers
When laying the pavers, the following steps should be followed:
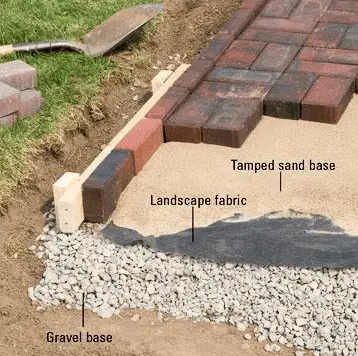
4. Building the Paver Base
Fill the excavated section with about six inches of gravel. Next, spread the base material evenly across the paving area before wetting it using a garden hose. Run the plate compactor or hand tamper across the area to turn it into a firm, even layer.
After compacting the ground, it should be stabilized and even, just waiting for your pavers. The more packed the bedding sand is, the more stable it’ll prove for your pavers.
Add a thin layer of paver sand to the paver base. Ensure that the surface is evenly smoothed out to make it leveled. You can use a wooden board to do that.
5. Lay the Geotextile Fabric Over The Soil
The next crucial step is placing pieces of landscaping or geotextile fabric, mainly PVC. This is one step you cannot afford to skip! It comes in handy in:
- Firming up the base
- Enhancing drainage
- Preventing weed growth between the pavers
You can use spikes to secure the edges of the geotextile fabric.
6. Add Edge Restraints
Edge restraints come in handy in maintaining your paved section. If you skip this step, your pavers may end up moving and separating.
Edge restraints are retaining walls made of wood, metal, precast concrete, or plastic. Use nail spikes to hold the restraints down.
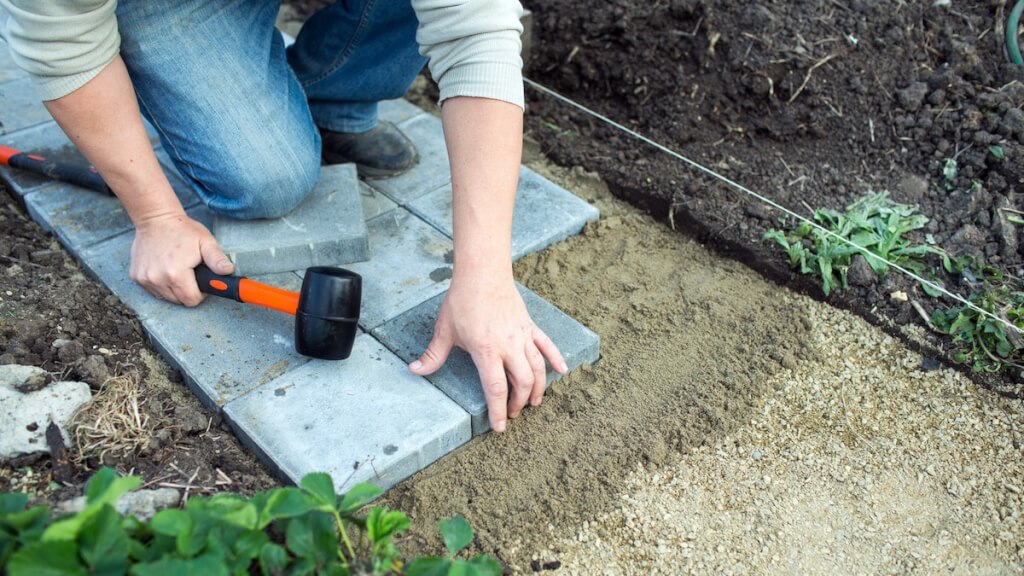
7. Laying the Pavers
Set the pavers down however you want but ensure that they lie flush against each other. If gaps remain along the edges, fill them up with pavers cut with a diamond saw and a masonry chisel. This is where the protective glasses and gloves come in.
Begin by laying the pavers from one corner/end, working your way across. As the laying process goes on, put the wooden board on top of a finished section and hit it gently with the rubber mallet.
You can also utilize a mechanical plate compactor instead of a wooden board and rubber mallet.
8. Add Stone Dust
After laying the pavers, the final phase is sprinkling stone dust over the pavers and sweeping it into the crevices.
Using fine sand instead of coarse sand makes sense since it easily compacts and fills up the joints faster. Better yet, the stone dust acts as an extra layer of protection against weeds.
To be on the safe side, after adding the joint sand to the pavers, you can add paver sealant to the entire area. The sealant will secure the pavers in place and prevent slipperiness.